
Setup Before Data
Important
You must complete processes from the HomeBuilder Install and Subscribe Help Files Section. Ensure they have been thoroughly reviewed and completed.
Create your HomeBuilder Company and Activate It
Once the license configuration is complete, a new Company can be created. This Company will first be used to setup the configuration of your future Live Company. Once the setup is ready, it can be copied to one or more Live Companies.
Search for “Companies” and open the Companies Page. To create a new Company:
- Give the Company a name in the first selection box.
- In the “Select the data…” section, change to the option “Create New – No Data”. This will open a new Company Template with no Demo data to interfere with your setup.
- You may receive language or location comments. Accept them and move on.
- In the next screen click on Manage Users and add your users.
- Click Finish and your company will be created – this process takes ten or more minutes to complete.
Configuring environment in the New Company
After about ten minutes lapses, change your current company to the newly created one. Click on the Cog (top right of the whole BC menu) and select “My Settings”.
- Change the role to “Homebuilder Admin”.
- Change the Company to the one that you just created.
- "Search” for “HomeBuilder” and choose “HomeBuilder License Selections”.
- Click on the button “Edit List”.
- Click on the drop-down option on the License Type field and choose “Active” for the company that you just created – accept the messages and click through.
Permissions
The person or persons performing implementation should have a SUPER User Permission Set.
- To verify, search Users, open your User Card, and navigate to the User Permission Sets.
- In the Permissions set field, the Code should read SUPER. The field Description "This role has all Permissions".
- Additionally, ensure the other Permission Set requirements are fulfilled - check Functional Permissions and Roles
Creating a Template Company
There are 2 options to create a Template company that will be used as a base for further customization to your needs:
Option 1: Migrate the whole Template Company
When possible, we will migrate the Template Company directly into your Tenant. (Server with MS Business Central system)
Option 2: Import Configuration Packages- Data Migration
You now have a blank company licensed and activated for HomeBuilder. In that company, search Configuration Packages and import the following tables into your new Company- they can be supplied by your Implementation Partner:
Note
HomeBuilder Notes
- Import these Configuration Packages in the sequence provided.
- If you see any errors, re-apply the package immediately
- If some errors persist, investigate. In most cases, continue with uploading the following Configuration Packages.
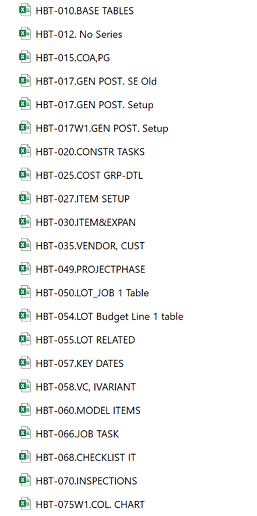
- When you reach package HBT-030.ITEM&EXPAN (before you migrate it) Interrupt the process.
- Re-apply Configuration Packages that had errors in the past.
- Use Item Worksheet Templates to import your Items to the system. Click Item Worksheet Manual for details.
- Continue with Packages HBT-030.ITEM&EXPAN and onwards.
- Many Users prefer to manually (use the system) create Lots rather than use Packages- as long as there are fewer than about 50 Lots. Otherwise, use:
- HBT-050.LOT_JOB 1 Table
- HBT-054.LOT Budget Line 1 table
- If you are not going to use Inspections in Homebuilder, skip Packages:
- HBT-068.CHECKLIST IT
- HBT-070.INSPECTIONS
- If you are not going to use Color Chars / Selection Packages, skip HBT-075W1.COL. CHART
- Note this process is bringing system configuration. It does not bring your history, i.e.: transactions.
Post Import Manual Updates
Add GL Accounts to Setup Tables
After you have imported up to the Chart of Accounts you must manually verify or add some of the GL Accounts to the Setup tables that were imported. The minimum configuration points are searchable and are as follows:
- Customer Posting Group – Receivables Account.
- Vendor Posting Group – Payables Account and Retainage Control Acc.
- Bank Posting Group – G/L Bank Account No.
- General Posting Setup:
- Sales and Sales Credit Accounts.
- Purchase and Purchase Credit Accounts (these are commonly in the Assets section of the balance sheet as accumulated costs of purchase invoices of the Items. These are commonly released to the Income Statement at year-end).
- “Tax Jurisdiction” CAON: GL Accounts added to”.
- “Tax Account (Sales)”.
- “Tax Account (Purchases)” – ITCs.
- “Reverse Charge (Purchases)” -typically the same as “Tax Account (Purchases)”.
If you need additional GL accounts, feel free to add them manually now. Search COA and add accounts.
Configure General Journal Templates
Search General Journal Templates, click Batches, and create General Journal Batches you will be using. For example:
- CASHRCPT for Cash Receipts. As Bal Account type put Bank. Enter your bank as the Bal. Account No.
- “Standard General Journal Line” for the “Journal Template Name” – “CLADJUST”.
In "General Journal Templates"; turn on the flag "Copy to Posted Jnl. Lines" to enable viewing posted entries for (at least) the following templates:
- CASHRCPT
- CLSADJUST
- DEPOSIT
Select Standard Adjustment Journals to complete all steps.
My HomeBuilder Settings
Search "My HomeBuilder Settings".
Set a default filter for the phase of Phases. The filter will be used for displaying records on multiple pages such as Page Cues, Lots, Models, Work Orders, Lot Installments, Selection Packages, etc. This setting takes effect for each user individually.